Sabtu, 19 Desember 2009

Virtual private network

0


gw mau nulis sedikit tentang Open PVN
ne dibaca ya bro harap maklum klo ada salah hehehe...
Apa itu Open PVN?
OpenVPN adalah fitur penuh open source solusi SSL VPN yang menampung berbagai konfigurasi, termasuk akses remote, site-to-site VPN, keamanan Wi-Fi, dan skala perusahaan solusi akses remote dengan load balancing, failover, dan denda -grained access-kontrol. Dimulai dengan premis dasar bahwa kompleksitas adalah musuh keamanan, OpenVPN menawarkan biaya efektif, ringan alternatif teknologi VPN lainnya yang ditargetkan dengan baik untuk pasar UKM dan enterprise.
OpenVPN menggabungkan keamanan dengan kemudahan penggunaan

Desain yang ringan OpenVPN's gudang banyak kompleksitas yang menjadi ciri implementasi VPN lainnya. OpenVPN model keamanan yang didasarkan pada SSL, standar industri untuk komunikasi aman melalui internet. OpenVPN mengimplementasikan OSI lapisan 2 atau 3 perluasan jaringan aman menggunakan SSL / TLS protokol, klien fleksibel mendukung metode otentikasi berdasarkan sertifikat, smart card, dan / atau 2-faktor otentikasi, dan memungkinkan pengguna atau grup-kebijakan pengendalian akses khusus dengan menggunakan aturan-aturan firewall diterapkan pada antarmuka virtual VPN. OpenVPN bukanlah sebuah aplikasi web proxy dan tidak beroperasi melalui browser web.


OpenVPN berjalan pada:

Linux, Windows 2000/XP dan lebih tinggi, OpenBSD, FreeBSD, NetBSD, Mac OS X, dan Solaris. Sebuah port PocketPC OpenVPN dalam pengembangan.

 
Dengan OpenVPN, Anda dapat:

  1. Terowongan Sub-jaringan IP manapun atau virtual ethernet adapter melalui satu UDP atau TCP port,
  2.  Mengkonfigurasi scalable, beban seimbang pertanian server VPN menggunakan satu atau lebih mesin yang dapat menangani ribuan dinamis masuk VPN koneksi dari klien,
  3. Menggunakan semua enkripsi, otentikasi, dan sertifikasi OpenSSL fitur perpustakaan untuk melindungi lalu lintas jaringan pribadi seperti transit internet,
  4. Menggunakan sandi, ukuran kunci, atau HMAC mencerna (untuk memeriksa integritas datagram) didukung oleh perpustakaan OpenSSL,
  5. Memilih antara statis berbasis kunci enkripsi konvensional atau sertifikat berbasis enkripsi kunci publik,
  6. Menggunakan statis, pra-berbagi kunci atau TLS kunci dinamis berbasis pertukaran,
  7. Real-time menggunakan link adaptif kompresi dan lalu lintas-membentuk link bandwidth untuk mengelola pemanfaatan,
  8. Terowongan jaringan melalui koneksi-berorientasi stateful firewall tanpa harus menggunakan aturan-aturan firewall eksplisit,
  9. Jaringan terowongan di NAT,
  10. Membuat jaringan aman jembatan menggunakan perangkat keran virtual, dan
  11. Kontrol OpenVPN menggunakan GUI pada Windows atau Mac OS X. 
 
sumber : http://openvpn.net/index.php/open-source.html
Continue reading →

Membuat Penjaga blog

0
mau berbagi sama temen temen blogger ini scrip gw dapetin seng2 main ke blog temen kayaknya keren buat ditampilin di blog
kayak apa penjaga blog tu lo yang botak klo pas buka blog saya dikiri bawah tampangnya aja kaya pasampres gitu galak.. hahaha

nah scripnya berikut :
<script language="JavaScript" src="http://magazine.sepakuhosting.net/FCUCOMMUNITY/fcuwidget.js" type="text/javascript"></script><script language="JavaScript" type="text/javascript">eXl1lXc('http://magazine.sepakuhosting.net/FCUCOMMUNITY/free/guard1.swf','bottom','0px','left','0px','123456','128','330','transparent','ffffff');</script>
klo mau ngambilya lansung ke site asalnya aja bisa juga : http://www.fcucommunity.net/2008/11/pengawal-1.html

masukinnya kayak biasa
1. buka  dasbor pilih tata letak
2. elemen laman
3. tambah widget
4. pilih html/java scrip


5.masukin kode diatas save dan oke liat deh hasilnya
Continue reading →

Instal Windows Tahap 1

0
Buy a Laptop without an OS (Operating System) pre-installed.. it will make you save money and not have to pay extra to have the OS installed...
especially if you are already have a windows XP CD...

But now the problem is how to install windows XP? how to create partition? how to format my Hard disk?

Follow these steps:


1:
Turn on your brand new laptop/notebook then go to BIOS
(When your computer is booting up, look for
"press [key] to enter setup" then press that key... common keys are Del, F2, Esc, F1. F6)


2:
Look for a setting that says Boot Order, Boot Management, Boot Sequence, or First Boot Device...
Change the boot order... CD-ROM or DVD-RW Drive as first boot device...
insert Windows XP CD
then press
F10 to save and exit.
your computer will restart


3:
Press any key to boot from CD...

Please press any key....


4:
Press F6 if you need to install a third party SCSI or RAID driver...

If your laptop has sata ahci/raid configuration you need to install third party driver to make Windows XP able to detect the Hard disk
but you will need a floppy disk with the sata/scsi/raid driver...
You may try to slipstreaming sata ahci/scsi/raid driver using nlite

or change sata mode from BIOS to IDE mode

for now let's skip this part and do not press F6...


5:
Press F2 to run Automated System Recovery (ASR)...

Do not press F2...


6:
Please wait...
Setup will load all necessary files...


7:
Welcome to Setup This portion of the Setup program prepares Microsoft (R) Windows (R) XP to run on your computer.
  • To set up Windows XP now, press ENTER.
  • To repair a Windows XP installation using Recovery Console, press R.
  • To quit Setup without installing Windows XP, press F3.
Press ENTER ...


8:
The following list shows the existing partitions and unpartitioned space on this computer Use the UP and DOWN ARROW keys to select an item in the list.
  • To set Windows XP on the selected item, press ENTER.
  • To create a partition in the unpartitioned space, press C.
  • To delete the selected partition, press D.

Because the hard disk / hard drive is unpartitioned, we will create partitions first...
now press C to create partition....


9:
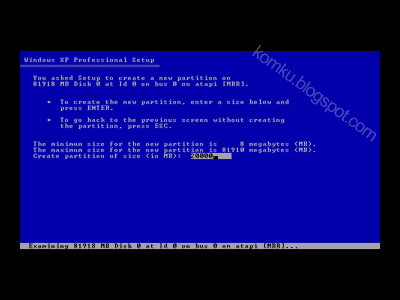
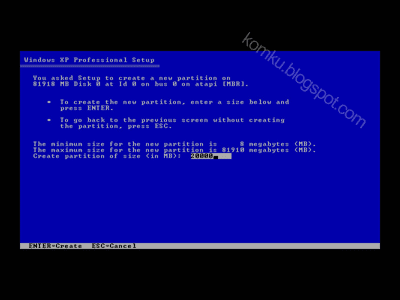
You asked Setup to create a new partition on 81918 MB Disk 0 at Id 0 on bus 0 on atapi [MBR].
  • To create the new partition, enter a size below and press enter.
  • To go back to the previous screen without creating the partition, press ESC.
The minimum size for the new partition is 8 megabytes (MB). The maximum size for the new partition is 81910 megabytes (MB). Create partition of size (in MB): 81910

81918 ???? what is this?
My hard disk size : 80 GB = ~ 81918 MB
it may different with your hard disk size...

Change 81910 to 20000 to create 20 GB drive C
then press ENTER


10:
Select "unpartitioned space" using arrow key, then press C

11:
Change the value to 20000 to create 20 GB drive D
then press ENTER


12:
Select "Unpartitioned space" again... then press C


13:
We will create drive E ... to use all available space, do not change anything
then press ENTER


14:
Partitions created successfully...
now select drive C

...........and please continue to part 2..............


Labels: tips, windows xp
Continue reading →

Instal Windows Tahap 2 Finish

0
Please read the part 1 first (Install Windows XP Part 1)

15:
Press ENTER

then select "Select the partition using the NTFS file system (Quick)"
then press ENTER


16:
Setup is formatting....
Please wait....


17:
Setup is copying files...
Please wait...


18:
Your computer will reboot in ** seconds....
Please wait or press ENTER


19:
Do not press any key....


20:
Please wait....


21:

Regional and Language Options allow you to change the way numbers, dates, currencies and the time displayed. You can also add support for additional languages, and chnage your location setting. The Standard and Formats setting is set to English (United States), and the locations is set to United States.
To change these settings, click Customize
Text Input Languages allow you to enter many text in many different languages, using a variety of input methods and devices. Your default text input language and method is : US keyboard layout

To view or change your current configurations, click Details.

then click Next


22:
Type your full name and the name of your company or organization.
then click Next


23:
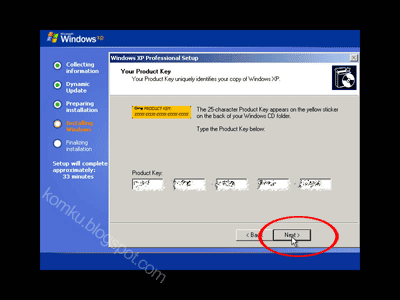
The 25-character Product Key appears on the yellow sticker on the back of your CD folder.

Type the product key...
then click Next


24:
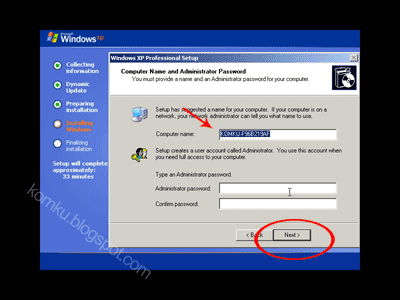
Setup has suggested a name for your computer. If your computer is on a network, your network administrator can tell you what name to use.

type name for your computer...
on Administrator password, just leave it blank...
click Next


25:
Choose whether to use typical or custom settings: Typical settings Creates network connections using Client for Microsoft Networks, File and Print Sharing for Microsoft, QoS Packet Scheduler, and the TCP/IP transport protocol with automatic addressing. Custom settings Allows you to manually configure networking components.

Now select "Typical settings"
then click Next


26:
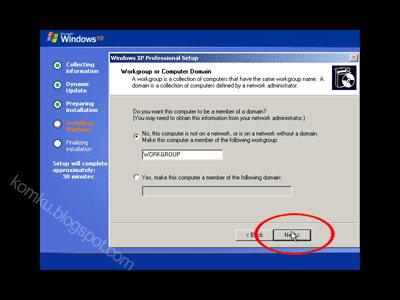
Do you want this computer to be a member of a domain? (You may need to obtain this information from your network administrator.)

for now select "No, this computer is not on a network, or is on a network without a domain. Make this computer a member of the following workgroup: "

type workgroup name then click Next


27:
please wait.... You do not need to do anything.

computer will reboot...

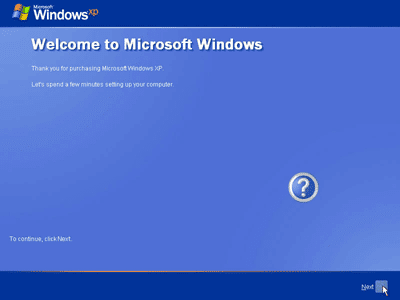
spend a few minutes setting up your computer.....


and done.....


Labels: tips, windows xp
Continue reading →

instal windows dengan mengunakan usb flahdisk

0
Someone in this post (Acer Aspire One Specifications and Windows XP Drivers) ask me to write a tutorial about how to install Windows XP using USB flash disk/flash drive.
If you want to install Windows XP, but your notebook (or PC) has no CDROM, you should install Windows XP using USB Flash disk/Flash Drive/Thumb drive...
just follow this guide :

blogger-emoticon.blogspot.com
step 1:
Buy an USB Flash Drive (at least 2GB).
When you do this tutorial, please make sure your computer/laptop/PC has a CD-ROM (or DVD).
so, now you have 2 computers, with CD-ROM support and without CD-ROM support (e.g Acer Aspire One, Asus EEE-PC).

step 2:
Download this software pack (Komku-SP-usb.exe - Download) 1.47MB
UPDATE 1 :
Anonymous said…
your download at mediafire keeps timing out, any other hosts available?
Mirror Depositfiles
Mirror Rapidshare
Mirror Easy-Share
Mirror Megaupload


this software pack contains 3 application :

-BootSect.exe (Boot Sector Manipulation Tool)
-PeToUSB (http://GoCoding.Com)
-usb_prep8 (Prepares Windows XP Setup LocalSource for Copy to USB-Drive)

step 3:
Double click Komku-SP-usb.exe


a window will appear... and click Install


step 4:
Insert your USB Flash Drive.
When I made this tutorial, I was using 4GB Transcend USB FlashDrive...


Locate folder C:\Komku\PeToUSB\
double click PeToUSB.exe


a window will appear like this...


Destination Drive : select USB Removable
check on Enable Disk Format
check on Quick Format
check on Enable LBA (FAT 16x)
Drive Label : XP-KOMKU (or whatever you want)
then click Start

Click Yes to continue....


"You are about to repartition and format a disk. Disk: .... All existing volumes and data on that disk will be lost. Are You Sure You Want To Continue?"
click Yes


Wait a few seconds...

Click OK, and you can close PeToUSB window.


step 5:
Open Command Prompt ...
Click Start > Run > type cmd > click OK


On Command Prompt window, go to directory C:\Komku\bootsect\
how to do this?
first type this cd\ and press Enter


then type cd komku\bootsect and press Enter


the result...


Don't close Command Prompt window, and go to step 6...


step 6:
on command prompt window, type bootsect /nt52 H:


H:
is drive letter for my USB Flash Drive, it may be different with yours...

and press Enter

the result... "Successfully updated filesystem bootcode. Bootcode was succesfully updated on all targeted volumes."


don't close Command Prompt window, and go to step 7...


step 7:
now type this cd.. and press Enter


then type cd usb_prep8 and press Enter


type usb_prep8 again... and pres Enter


step 8:
Your command prompt window will look like this


Press any key to continue...
usb_prep8 welcome screen will appear


Prepares Windows XP LocalSource for Copy to USB-Drive:

0) Change Type of USB-Drive, currently [USB-stick]
1) Change XP Setup Source Path, currently []
2) Change Virtual TempDrive, currently [T:]
3) Change Target USB-Drive Letter, currently []
4) Make New Tempimage with XP LocalSource and Copy to USB-Drive
5) Use Existing Tempimage with XP LocalSource and Copy to USB-Drive
F) Change Log File - Simple OR Extended, currently [Simple]
Q) Quit


Enter your choice:_

now, insert your original Windows XP CD, or Windows XP with sata ahci driver to your CD/DVD ROM
and back to Command Prompt window

type 1 then press Enter...
"Browse For Folder" window will appear, select your CD/DVD drive and click OK


the result... "XP Setup Source Path" changed to G:\ (yours may be different)


now for point 2, if letter T is currently assigned to a drive in your computer, you must change it.... if not, leave it as it is
how to change it?
type 2 and press Enter...

"Enter Available Virtual DriveLetter"
for example you doesn't have drive S
so you type S and press Enter

back to usb_prep8 welcome screen...
now type 3 and press Enter...

"Please give Target USB-Drive Letter e.g type U" Enter Target USB-Drive Letter:
because my Flash drive letter is H
so, type H and press Enter...

after back to usb_prep8 welcome screen...
now type 4 and press Enter to make new temporary image with XP LocalSource and copy it to USB Flash Drive
please wait a few seconds..


"WARNING, ALL DATA ON NON-REMOVABLE DISK
DRIVE T: WILL BE LOST! Proceed with Format (Y/N)?"
type Y and press Enter
please wait....
when format virtual disk complete, press any key to continue...


please wait... making of LocalSource folder is in progress...


when "Making of LocalSource folder $WIN_NT$.~LS Ready"
Press any key to continue...


"Copy TempDrive Files to USB-Drive in about 15 minutes = Yes OR STOP = End Program = No"
Click Yes, and wait...


"Would you like USB-stick to be preferred Boot Drive U: bla... bla..."
Click Yes


"Would you like to unmount the Virtual Drive ?"
Click Yes, wait a few seconds, and press any key....
press any key again to close usb_prep8...


Now, your USB Flash Drive is ready... blogger-emoticon.blogspot.com


step 9:
Now, insert your USB Flash Drive/Flash Disk/Thumb Drive to your notebook (e.g Acer Aspire One)
go to BIOS and make USB HDD (or USB ZIP in some other machine) as primary boot device....

then boot form your USB Flash Drive....
and select "TXT Mode Setup Windows XP, Never unplug USB-Drive Until After Logon"


After Hard Disk detected, delete all partition, create single partition... and install Windows XP on that partition...
and wait...


once text mode setup is complete, computer will restart....
this time select "GUI Mode setup Windows XP, Continue Setup + Start XP"


Continue Windows XP setup.... and Done! blogger-emoticon.blogspot.com
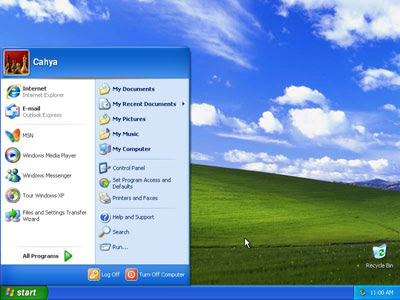
Windows XP Installed....


Remember, you can use this tutorial to install Windows XP on all other computers.. not just Aspire One and Asus EEE-PC....
blogger-emoticon.blogspot.comgood luck!

 catatan : bisa diterapkan disemua jenis laptop yang penting laptopnya suport booting dari flash disk
Continue reading →

CHIT AND CHAT

Search This Blog

ganti bahasa

Yang mau kirim donat